You may have heard about Ethereum Blockchain. In the current DeFi space, most of the ICOs and many different products were built either by using Ethereum or atop Ethereum. Ethereum is a powerful public Blockchain that has a vast community and some of the most active developers across all different Blockchain products. It powers the most interesting products in the public Blockchain space and we still haven’t seen its full potential. There is even a new and updated version coming within the next couple of years, but before I dive into the exciting new features that Ethereum is bringing, let’s talk history a little bit!
The road to Ethereum 2.0
In 2015, Vitalik Buterin released the first public version of Ethereum. It was a big release of Blockchain that is still shaking the landscape of different Blockchain ecosystems today. At the time of its release, Vitalik knew that it wasn’t yet a “final” product as it still had obvious limitations so he carefully planned Ethereum’s next steps. Vitalik knew what had to be researched and developed for his original vision to come true.
Ethereum 2.0 is the next step up to the Ethereum 1.0 platform. Between the initial version and the release of version 2.0, there have been several intermediary upgrades:
- Frontier, July 2015
- Homestead, March 2016
- Metropolis: Byzantium, October 2017
- Metropolis: Constantinople, February 2019
- Istanbul, December 2019
If you want to dive in to what each release included and what it fixed, Consensys described that in this great article: A Short History of Ethereum.
![]()
The latest Ethereum release is called Serenity – dubbed “Ethereum 2.0”. It is a major upgrade to the current Ethereum public main net which is designed to accelerate Ethereum’s usage and adoption by improving its performance. The objectives of new version extend beyond being able to process transactions at scale, they also include other design goals, such as:
- Simplicity: to minimize complexity, even at the cost of some losses in efficiency.
- Resilience: to remain live through major network partitions and when a very large portion of nodes go offline.
- Longevity: to select all components such that they are either quantum secure or can be easily swapped out for quantum secure counterparts when they become available.
- Security: to utilize crypto and design techniques that allow for a large participation of validators in total and per unit time.
- Decentralization: to allow for a typical consumer laptop to process and validate shards.
We’ll go deeper into this in the following chapter and at the end of this report. I’ll also show you how to write a web3.js script which you can use to call a Deposit Contract to become Validator in the upcoming Proof of Stake update.
Serenity
Ethereum 2.0 will be released in multiple phases.:
- Phase 0: Beacon Chain
- Phase 1: Shard Chains
- Phase 2: Execution Engine
These phases will be rolled out incrementally over the course of the next few years. Once all phases are live, the Ethereum platform will be more efficient and scalable. All of the new improvements will ensure that it is able to handle thousands of transactions per second. How will that be possible if Ethereum still wants to be as decentralized and secure as it is now? This can be made possible by introducing two improvements that are not available currently in Ethereum 1.0 – Proof of Stake and Sharding.
Proof of Stake is the next consensus model. It is an upgrade from the Proof of Work function that was found in Ethereum 1.0. There are no miners, but instead, participants are known as “validators” which are able to propose new blocks and validate blocks from another validator (but only if they stake at least 32 ETH by depositing the funds to the official deposit contract). Only then can validators run client nodes to participate in PoS. Validators who are randomly chosen by the Beacon Chain and correctly propose and attest blocks will receive a reward in ETH as a percentage of their stake. However, if a validator attempts to compromise the truthful continuation of the Blockchain, their deposit will be “slashed” – meaning they will lose some of their 32 staked ETH. This expands even further if a validator fails to stay online and complete their share of the duties as the block reward will be decreased for them. This incentivizes validators to stay online as consistently as possible.
The Proof of Stake mechanism offers more crypto-economic security (staked ETH) compared to the more abstract disincentive of losing the cost associated with electricity. Previously, the cost of mining was in the buying of and investing in the mining equipment, as well as paying extremely high electricity bills. Ethereum 2.0 will only require consumer-level hardware to run a validator node. Even your smartphone could be a validator node! Thanks to this development, the network is able to be more decentralized as the point of entry is much lower. You don’t even need to have the full 32 Eth to become part of the validation network because some staking services will offer “pooled staking” where you can combine resources with others. If you don’t have any technical knowledge to run your own validator with 32 eth, a staking service will do that for you whilst still allowing you to remain in control of your funds. The Proof of Stake feature will be launched in the first stage of Ethereum 2.0 known as Phase 0.

Phase 0: Beacon Chain
The key function of the Beacon Chain is to manage the Proof of Stake protocol itself and all of the Shard Chains (this will come in Phase 1). The Beacon Chain manages all the validators and their stake, as well as being responsible for choosing validators every Epoch (6.4 minutes) for different duties e.g. block proposals and attestation of the proposed blocks and organize validators into committees to vote on proposed blocks and applied consensus rules.
Managing Validators
Validators can join the common set of validation nodes by sending the required stake of 32 Ethereum to a deposit smart contract that is deployed on the current version of Ethereum. When the validation of the proposal is completed, the state is locked and an appropriate event is emitted by the deposit contract so the Beacon Chain can pick it up. After being processed by the Beacon Node and having waited for some time in the queue, the validator will be put into the common validator set on the Beacon Chain and will be considered active. It’s important to understand that only “active” validators can propose and validate various Beacon Blocks, and in Phase 1 also Shard Chains.
When a validator wants to opt-out of the system and withdraws the stake that they have earned, the Beacon Chain will make sure it is possible after waiting approximately 97 days. After that time, the total stake (plus rewards minus penalties) will be withdrawn into the Shard Chain at Phase 2. At this stage, it’s not possible to withdraw back to Ethereum version 1.0, so be careful when opting in as a validator! Another important aspect to remember is the launch date of the Shard Chains. These will be released at some point in 2021/22, with Phase 2 coming in 2022/23. These dates can easily change as there were already delays for the Phase 0 launch.
You can think of its management like this: Validators in the Proof of Stake consensus are like musicians that need to be orchestrated. Beacon Chain is like a conductor that coordinates all the musicians so the whole band can play beautiful music.
Decentralized randomness, committees, and block proposers
Besides managing the validator state and stake, the Beacon Chain is also responsible for randomly selecting proposers and attesters from a pool of active validators. All randomly selected attesters are grouped together to form a committee. This committee is then responsible for the validation of incoming block proposals. Their work is critical to the security of PoS Blockchain as they vote on which block forms the true history of the chain. Beacon Blocks function as such blocks as they also contain crosslinks to different shards, but we will go into further detail about this below.
Such votes from committees are known as “attestations” as each committee member will attest to the block they are voting for and there can be at least 128 validators per committee.
Ethereum 2.0 blocks are produced at regular intervals every 12 seconds. This 12 second period has its own Slot in Beacon Chain. Every 6.4 minutes(that concludes into 32 slots) are called “Epoch”
A slot is a chance for a block to be added to the Beacon Chain and its shards. Every 12 seconds, one Beacon Block and up to 64 Shard Blocks are added to the system. Not every slot will have a full block, it’s possible that a slot may contain an empty block. But this gives us a simple, theoretical improvement of 64 times compared to an Ethereum 1.0 where 1 Block is every ~13.5 seconds which gives roughly ~20-35 transactions per second based on the complexity of an operation. Taking into consideration only the increase of blocks that can be confirmed in parallel, we see transactions per second increase to ~1280-2240 as Layer 1 solution! Currently, Layer 2 scaling solutions like ZK-Rollups can increase TPS to nearly ~2k-3k on Ethereum 1.0 but with Ethereum 2.0 this could even increase to nearly 100k TPS as Vitalik mentions in his tweet.
In every Blockchain system, there is a “finalization” process. In a Proof of Work systems, when a block is mined its transactions are considered “confirmed” and after a couple of confirmed blocks we can say that our transaction can be thought of as “finalized”. A similar thing is with Proof of Stake systems. After a certain period of time, a block can be recognized as forever etched in the history of a Blockchain and nothing can revert that operation. In Ethereum 2.0, Epochs form this kind of a checkpoint, where blocks and their processes can be thought of as “finalized”.
Proposers are selected by RANDAO+VDF with weighting on the validator’s balance. It is possible that the validator will be a block proposer and a committee member at the same time, but the chances of this are low. It’s worth remembering that validators can “propose” a new block OR “attest” proposed blocks.
Rewards and penalties
The notion of rewards and penalties are important aspects of the Proof of Stake system. These two things are at the core of crypto-economic security and Beacon Chain’s role is to administer it.
Validators receive rewards when they propose and attest blocks when it is their turn to play their part. However, when they decide to skip their turn or to propose an invalid, malicious block, they are penalized by having some of their 32 Ether deposit reduced (slashed) and even being potentially banned from the system entirely. For this to happen, however, their stake needs to fall below 16 Ether. In addition, there is also a small penalty if a validator node is disconnected from the network to motivate people to keep their nodes up for as long as possible.
The Implementation of the Beacon Chain and its deployment will mark the start of Phase 0 and the start of the Proof of Stake. Initially, the Ethereum foundation wanted 16,384 validators to be active at the beginning of Phase 0 with more validators to be added later. Despite it appearing so at first glance, this number is not random. They want 512 validators to be assigned per slot and split into 4 committees. Each Epoch has 32 slots: 32*512 = 16,384 validators.
As I mentioned in the beginning, Beacon Chain can be thought of as a conductor and validators as musicians – the next phase can be thought of as the instruments.
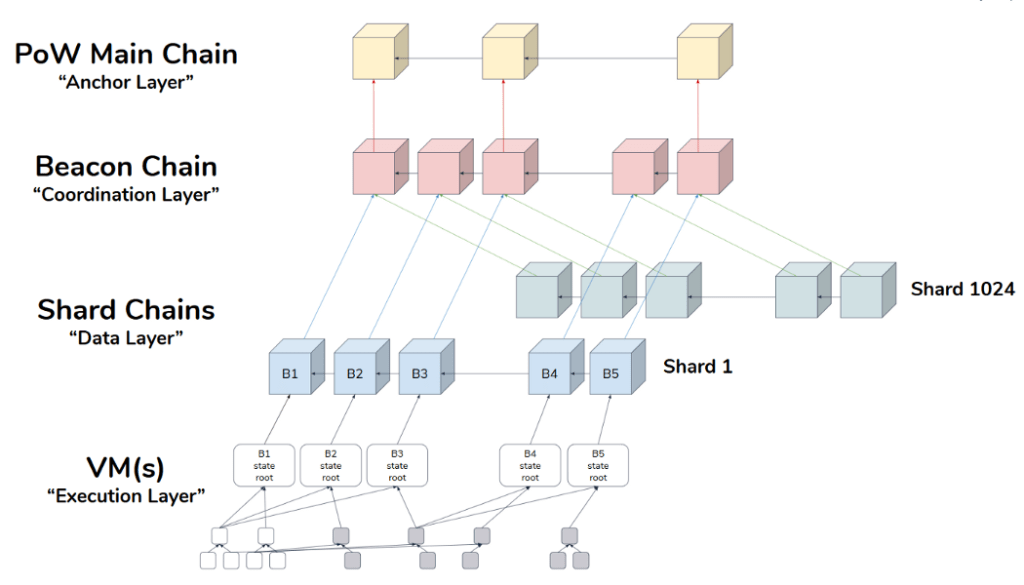
Phase 1: Sharding
The main difficulty in achieving scalability that Blockchains (including Ethereum) currently face is that every node has to verify and execute every transaction. The addition of Shard Chain is a scalability mechanism in which every shard (“mini Blockchain”) executes its part of the transaction in parallel to the other 63 shards. This means that Ethereum is split into 64 pieces of smaller Blockchains. With that many different shards, how are they going to communicate with each other? To help with this issue there is Beacon Chain and crosslinking.
Crosslinks
A crosslink is a reference in a Beacon Block to a Shard Block. A crosslink is a method of how the Beacon Chain follows the head of a Shard Chain. There will be 64 shards so each Beacon Block can contain up to 64 crosslinks. When the Beacon Block has been finalized, the corresponding Shard Blocks are considered finalized too. This is needed for a cross-shard communication as all Shard Chains are following the Beacon Chain at all times.
Phase 1.5
The next phase that hasn’t been mentioned until now is the so-called “Phase 1.5” which includes a transition period from Ethereum 1.0 to Ethereum 2.0. This means the current Ethereum chain will become the first shard on Eth 2.0, so all transaction history will be available. Unfortunately, at this time there is no exact date when this will happen.
Phase 2
The last step is expected to launch in 2022/23 but is not as clearly defined as the previous steps. Generally, this will be the phase where all the functionality of the entire system will start to come together. Each shard will start processing complex transactions and smart contracts will be reintroduced. This will support accounts, contracts, state, and other abstractions that developers and users are familiar with from the current smart contract languages.
This is a lot to cover but I hope you have a general understanding of how Ethereum 2.0 will come together and why it is such a big upgrade and testament to several years of decentralized research.
We’re not quite yet done though! Phase 0 is not yet launched on Mainnet but we can still work with the test implementation of the Beacon Chain and deposit contract that was officially accepted as a final implementation. I will show you how to write a simple web3.js script that will communicate with a Deposit Contract and you will be able to create a fake validator. I mean “fake” because all data we’ll use will be randomly generated in such a way that the deposit contract can accept it as a valid transaction. Let’s go!
Call with the Beacon Chain
You may ask yourself the question: “how are we going to communicate with a Beacon Chain if Phase 0 hasn’t launched yet?” Good question! The answer: Goerli test network and test Beacon Chains. In software engineering, before releasing something into production where customers will use the product, extensive closed tests are performed by the engineering team. After the initial testing phase, it moves on to Beta testing where it finally opens to the public. Currently, Phase 0 is in the open Beta test stage where everyone can participate and report any bugs if they occur. Ethereum has a couple of testnets that simulate the actual Ethereum main network. One such testnets created specially for the Eth 2.0 launch is the Goerli test network. It’s an Ethereum 1.0 network but with integration to the Beacon Chain and deployed final Deposit contract. It is to this contract we’re going to send our dummy deposit today.
Before we start make sure you have following installed:
- Python3
- NodeJS version >= 10.16
- NPM
- Code editor
- Metamask extension in a Chrome/Firefox based browser
- Infura account
With all of that in place, we can start coding! I promise that it won’t be a complicated script.
We will be basing our script on this deposit spec. We’re mostly interested in 4 arguments for the deposit function. Let’s go through it together.
- Pubkey : BLS Public key of a validator for Ethereum 2.0
- Withdrawal credentials: BLS Public key for an Ethereum address to which all withdrawals will go. It can be another address of a validator or shard.
- Signature: Signed pubkey and withdrawal with BLS private key used for creating Pubkey.
- Deposit data root: All three above combined in one structure with the amount to be sent and signed. Hash of that signature is used for data protection against malformatted calldata.
To generate this data we would need to use a specific version of BLS cryptographic library used by Prysmatic labs who are the people behind the Onyx testnet which implemented Phase 0 (protocol Beacon Chain). We would also need to manage private keys, withdrawal credentials and write a Python script which puts all of that info into a Deposit Data Root data structure. There are solutions and clients ready-made and waiting to be used and tested that do all of this behind the scenes. In this tutorial, we will focus on writing a simple Web3JS script that will make a call to a Deposit contract using dummy data that we will generate by using a pre-made script.
Setup
All good tutorials start with environment setup and this tutorial is no different. It is important to note; I’m using a macOS operating system so all commands you’re going to see will be based around that system, as well as in other Unix-based systems.
In the beginning, I mentioned that you will need a Metamask extension. That hasn’t changed but we’re also going to need to do some additional steps.
- Change the network from the Main Ethereum Network to Goerli Test Network.
- Click on the following link and request some test Goerli Eth: Goerli: Authenticated Faucet. The quickest one is 6 Goerli Eth.
- In Metamask: click on three dots → Account Details → Export Private Key.
- Copy the private key and save it somewhere, we’ll need it later.
- Never share your private key with anyone – for the purposes of this demonstration you’ll see a fake private key in my code
Create a new directory under which we will store all of our files. Next, open your editor of choice. Mine is VS Code but I’m not judging other choices as long as you’re comfortable with them.
Inside the directory, open a terminal and initialize an empty NPM project.
- mkdir DepositScript
- cd DepositScript
- npm init
You can answer the questions asked by the NPM however you like.
As we have an empty npm project we can only install the dependency, so we’re going to need web3js.
- npm install web3js
After the installation is completed, we need to create an empty script.
- touch deposit.js
At the end of our setup we need just one additional thing; the ABI for the Deposit Contract so we can communicate with it. You can find that file in the Eth 2.0-specs repository. https://github.com/ethereum/eth2.0-specs/blob/dev/deposit_contract/contracts/validator_registration.json
You can copy the entire file and place it in the main directory of our little project. For those who don’t know what ABI is, it’s a smart contract formal definition that enables interfacing with already deployed smart contracts. We don’t need to know the exact implementation of the smart contract, only what function it defines, and with what parameters that we are able to interface with it.
Deposit script
Below you can find an almost functional script with some missing data that we will fill in together. I’ll also explain additional points regarding the deposit contract.
const Web3 = require('web3');


const goerliRpcUrl = 'https://goerli.infura.io/v3/<INFURA-KEY>';
const web3 = new Web3(new Web3.providers.HttpProvider(goerliRpcUrl));

const PK = '<YOUR-PRIVATE-KEY';
const AMOUNT =;
const DEPOSIT_ADDR = '';
const DEPOSIT_ABI = require('./validator_registration.json').abi;

async function main() {
    const pubkey = ‘’;
    const withdrawalCredentials = ‘’;
    const signature = ‘’;
    const depositRoot = ‘’;

    const depositContract = await new web3.eth.Contract(DEPOSIT_ABI, DEPOSIT_ADDR);

    const query = depositContract.methods.deposit(pubkey,withdrawalCredentials,signature,depositRoot);
    const encodedABI = query.encodeABI();

    const account = web3.eth.accounts.privateKeyToAccount(PK);

    const tx = {
          from: account.address,
          to: DEPOSIT_ADDR,
          gas: 7999999,
          gasPrice: 1000000000,
          value: AMOUNT,
          chainId: 5,
          data: encodedABI
        }

    const signed = await web3.eth.accounts.signTransaction(tx, PK);
    const receipt = await web3.eth.sendSignedTransaction(signed.rawTransaction);
    console.log(receipt);
}

main().catch(e => console.log(‘Error:’, e));
Copy the above code you deposit.js file.
The script itself is not as complicated as I promised. First, we need to import the Web3JS library which we’re going to use to communicate and make calls with the Goerli test network. The next step is to create a provider for Web3 so it knows which exact network we’re trying to connect to. We’ll be using Infura Provider to accomplish this in an easy way.
- Go to https://infura.io/ and log into your account.
- Click on the side menu Ethereum
- Create a new project and name it Deposit Contract
- In the project settings, you will see a Project ID. You need to copy that value and paste it under <INFURA-KEY> in the script.
Remember the private key from the Metamask account? You can paste it into the PK variable.
The amount variable relates to how much Goerli Eth we’re going to send in a transaction. Setting it to 32 gEth will be a good assumption as this is the amount needed for a validator to be accepted by Beacon Chain but we don’t have that much gEth to do it. Instead, we’ll set it to 1 Eth as this is the minimum amount a Deposit contract will accept as a call to it. In the next tutorial or webinar, we’ll be using the full 32 Eth to run a validator node, but for now, we’re only interested in making a valid call to a Deposit contract.
To ensure the proper functioning of our script, we need a current deposit address. We can find it on the Prysmatic website Prysm Eth2 Testnet. Deposit ABI is exactly the same deposit ABI we got from the Eth 2.0-spec repository.
The main function is where all of our logic is located. We initialize the deposit contract instance using web3 so we can make calls to it. Next, we need to create a query for our deposit function call and encode it. Luckily web3js provides a built-in function just for this. After that, we’re going to create a transaction object which we will sign with our private key and broadcast to the Goerli Ethereum Test Network.
At this stage, we’re still missing 4 things – the arguments for the deposit contract.
Dummy data
To generate dummy data we will use a simple python script. I won’t go through how it works, but it is based on the current Eth 2.0-spec repository test code. You can download the script from the GitHub – JuliusBrain/eth2depositdummydata. Instructions on how to run it are in the README.md file.
One important point to note; when generating the data, the deposit data root structure encodes an amount used for that deposit. Make sure when running the script to use the value of 1 Eth, not 32 Eth. If we generate data with 32 Eth and only send 1 Eth, the Deposit contract will throw some errors at us and we don’t want that.
Paste the generated data into appropriate variables and our script will then be ready. To run it, type node deposit.js and the transaction will be created and broadcast to the network. This is the sample transaction I created Goerli Transaction Hash (Txhash) Details | Etherscan. In that tx view, you can also check the Validator status by clicking Validator PubKey. Validator Info | Onyx Beacon Chain (Phase 0) Ethereum 2.0 Explorer. You should see a note of the total Ether deposited with the status of the deposit and validator. If we deposit the full 32 Eth, after around 8 hours of waiting our Validator will be activated, but we will explore this some other time.
Summary
I hope you now understand what Ethereum 2.0 is and why it’s an important upgrade. Personally, I can’t wait to start developing on that system and discover what it brings to the users thanks to its scalability, efficiency, and transaction throughout. Amazing things are built on Ethereum 1.0 right now – the whole DeFi is built atop Ethereum with its current limitation. I can only wonder what kind of innovations in decentralization and application usage will happen on Ethereum 2.0.
There will be an incoming Webinar in which we will dive into this topic further. I will show you how to set up your own Beacon Chain and how to bootstrap the whole test network using our Beacon Chain. Stay tuned for more information!
References and links used to create this article:
[1] https://consensys.net/knowledge-base/ethereum-2/faq
[2] https://consensys.net/blog/Blockchain-explained/what-is-ethereum-2/
[3] https://www.mycryptopedia.com/ethereum-beacon-chain-explained/
[4] https://media.consensys.net/state-of-ethereum-protocol-2-the-beacon-chain-c6b6a9a69129
[5] https://docs.ethhub.io/ethereum-roadmap/ethereum-2.0/eth-2.0-phases/
[6] https://ethos.dev/beacon-chain/
[7] https://github.com/ethereum/eth2.0-specs
Author: Adrian Hetman