OAuth 2.0 is the industry-standard protocol for authorization.
When I’ve read the above sentence on the OAuth 2.0 homepage I felt like this is the kind of knowledge that I should have in order to call myself a software engineer, so I started digging. I remember that I felt a little bit scared that I will have to break through a lot of knowledge that is difficult to learn, but it turned out alright, and I’ve decided to share what I’ve learned!
What you’ll get from this article:
- How OAuth 2.0 works
- How an application gets an access token
- How SPA and web server applications deal with OAuth
- Types of the access token and their validation
How OAuth 2.0 works
First of all, if you are like me, the official specifications are not always the best place to get a bigger picture of how OAuth works, as almost immediately you may overwhelmed by the amount of information (because it’s not one specification but a lot of them). To understand how OAuth works, let’s ask questions.
What problem does OAuth solve?
Let’s take for example an application where we want to see a user’s daily schedule, assuming that our user has a Google account with some data to get from calendar — but how we can ask the user for this data whilst considering security? That’s the moment where OAuth comes to play, but what is important is: OAuth doesn’t tell the application who you are, it just gives the application access to data which it asks for!
How does OAuth solve it?
The simple answer is, by giving an access token which allows your client application to get the data it needs from a resource server. I would like to describe an analogy which helped me a lot to understand this:
Let’s assume you work for a bigger company where you have to use an access card to get in. This card has been given to you on the first day of work with proper permissions by a person which knows that you are a new employee. After that first day you use this card to get into the company and nobody checks your identity anymore, you just put your access card to the reader and the door will open. Furthermore, you cannot open all doors but just this one which allows you to do your everyday job tasks. OAuth is based on this kind of flow.
Conclusions:
- You are verified on the first day and receive an access card which you can use every day
- Every reader opens the door for you (if access to this area has been granted to you)
- The reader doesn’t know anything about your identity, the only thing that is important for the reader is if you have a valid access card in your hand.
How does an application get an access token?
From an apps perspective, the goal is to get an access token and then get data thanks to this token — so how does an app get an access token?
Ways to obtain a token by OAuth:
- Authorization Code Flow (web apps, native apps)
- Device Flow (AppleTV)
- Password (for first-party apps)
- Client Credentials (machine to machine)
Authorization Code Flow is the most common approach, as it is used on both the web and in native applications. Before we can answer the question of how it actually works in OAuth one more thing we need to know is what kind of roles exists in OAuth.
OAuth Roles:
- User (Resource owner)*
- Device (User-agent)
- Application (Client)
- OAuth server (Authorization server, where access token comes from)
- API (Resource server)
*names in parentheses are those used in OAuth spec
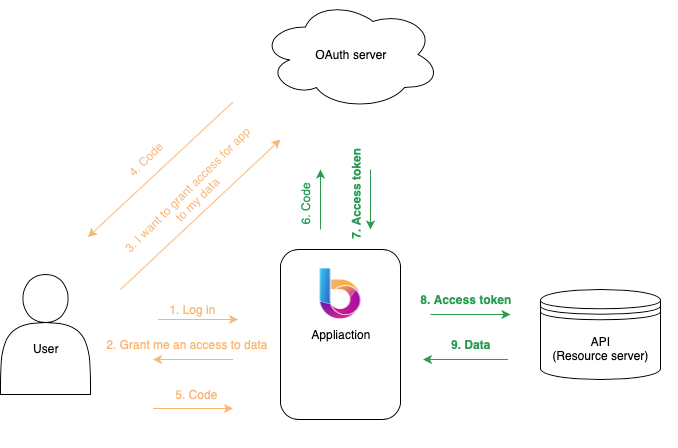
A proper diagram can be worth more than a thousand words:

- User logs in to the application;
- Application request user for access to some data (Google Calendar) and redirects the user to OAuth server;
- User logs in to an OAuth server with credentials;
- OAuth server returns a temporary code which will be then exchanged for an access token by the app;
- The user sends temporary code to the app;
- The application exchanges the code for an access token;
- The OAuth server returns an access token for the app;
- The app uses the access token to get some data from a resource server;
- Resource server returns user data to the application.
Off-topic: The application logo on the above diagram isn’t there by accident, it’s my newly created app to betting with friends. I named it Betbitly, check more if you are curious.
This access token flow can be divided into two channels:
🍎 Front channel (red lines)
Data is sent via the URL and because of that request/response can be tampered by user/malicious software. In this kind of situation, someone to not seeing someone that you add access token. Both sides don’t know if data has not been tampered or sent from unwanted sources. Someone can change data along the way.
You can imagine a situation where you send a letter to your friend which doesn’t have a letterbox and you don’t choose an option to deliver to the owner’s hands, so the postman may leave the letter at the front door, so until your friend returns home, somebody else can get at this letter and change something in it. In this case, neither you nor your friend can be 100% sure that the letter has not been changed, by an uninvited person. Why even use a front channel in this case?
The front channel is necessary because it is a natural interface to communicate with users to authorize an application to use data from the resource server, another example can be a mobile device.
🍏 Backchannel (green lines)
This is the secure part of communication because it is sent from an application to the server over HTTPS (and cannot be tampered with).
In our analogy with the letter, it will be an option to deliver a letter to the owner’s hands.
Conclusions:
- OAuth can obtain an access token in four different ways
- There are five different type o OAuth roles
- The way how the application obtains user’s data can be divided on two channels (front, back)
Go deeper, two types of clients!
In terms of application possibility to keep a secret we can divide it again on two types of clients:
Confidential Clients (application runs on server) which can keep a secret
and Public Clients (SPA or native) which cannot.
Keeping in mind this division, I will describe what a request looks like on each of these types. It will be four requests, two for authorization and two for getting access token (the numbers refers to the numbers on the schema).
Authorization (front channel 🍎)
- User => OAuth server (3)
- OAuth server => User (5)
Getting an Access Token (back channel 🍏)
- Application => OAuth server (6)
- OAuth server => Application (7)
Web server application (Confidential Clients)
Authorization (front channel 🍎)
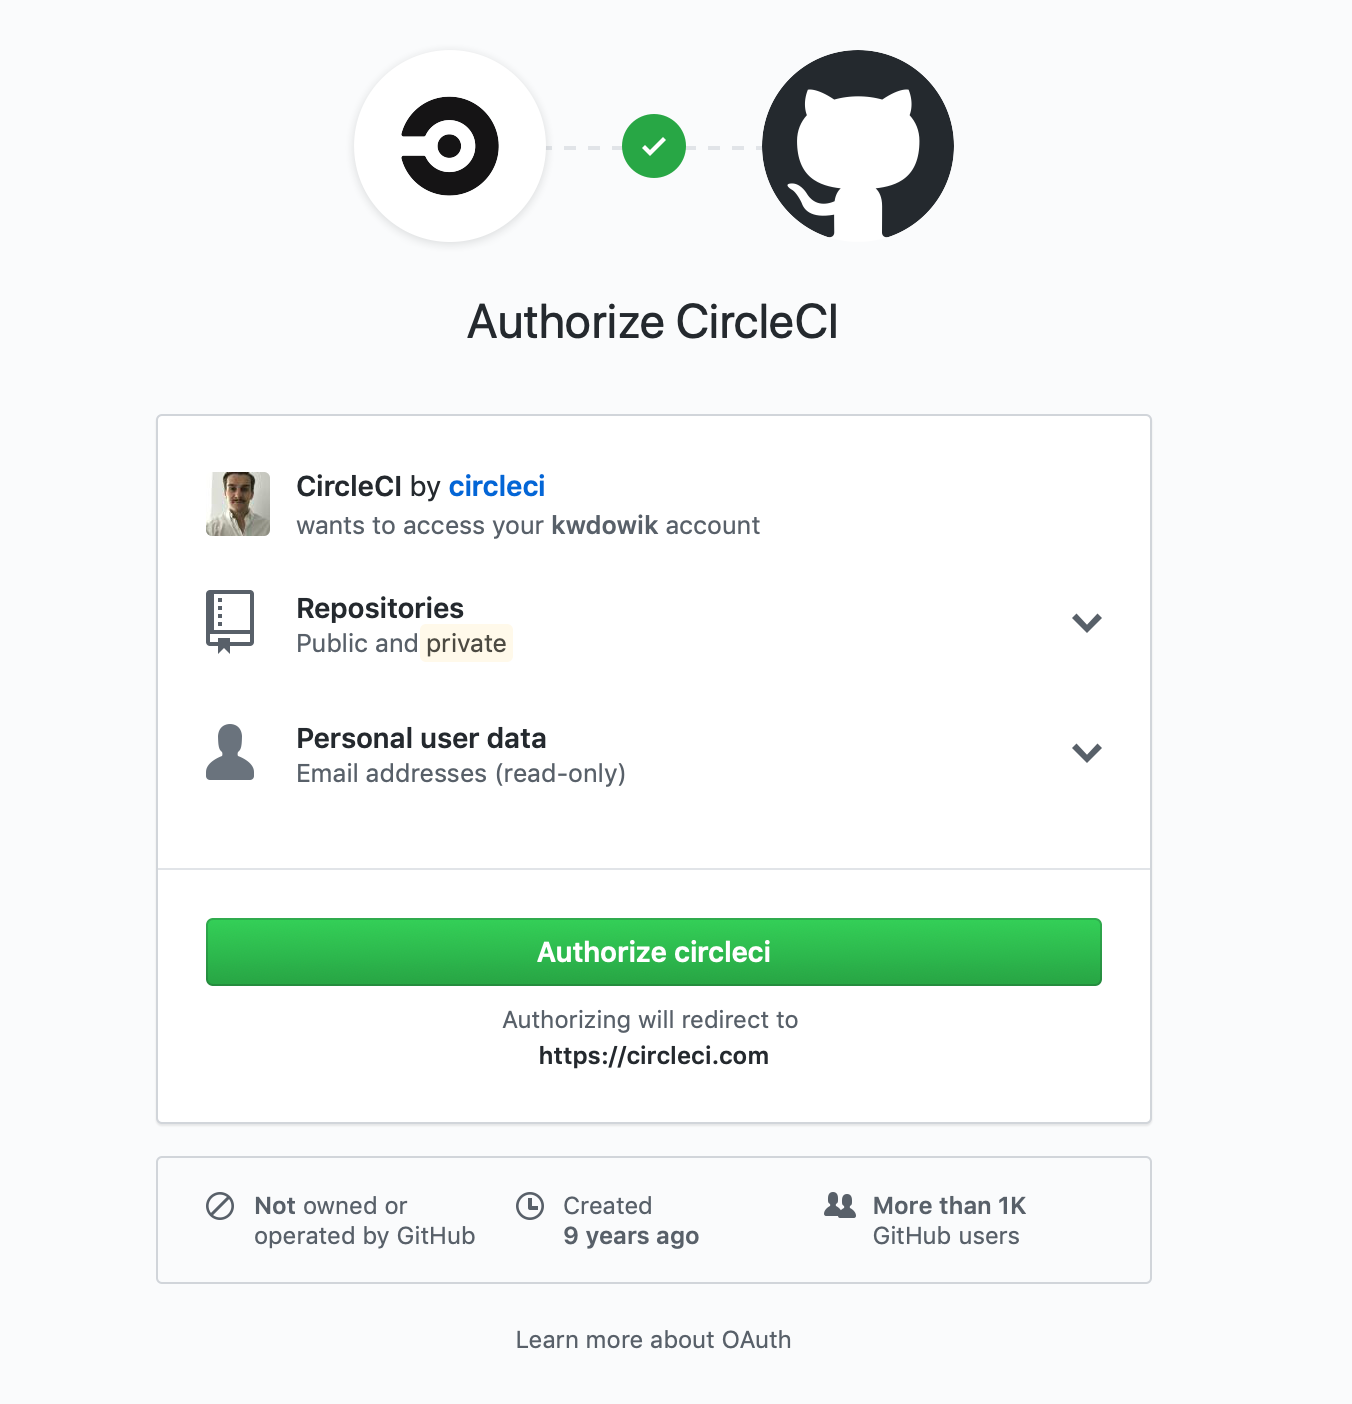
It’s worth mentioning just a bit about Scope here. Scope guarantees an application only has access to data which was requested during login (of a user to an OAuth server). Users should always should be which data access has been granted.

If a user allows an application access to resources, the OAuth server will respond with code which then will be exchanged by the application for the access token:
Getting access token (back channel 🍏)
Single-Page Application (Public Clients)
This kind of an application cannot maintain client’s secret because it’s run entirely in the browser, so to preserve authorization code flow introduced above, have to generate secret on each request, at this is called PKCE which stands for Proof-Key for Code Exchange, so instead of sending client secret you send PKCE generated when every getting access token flow starts, to achieve this we have to change a little bit our previous web server authorization request (auth-req.web-server.js) by adding two ingredients:
- code verifier (random string 43–128 characters long)
- code challenge (url-safe base64-encoded SHA256 hash of the code verifier)
Authorization (front channel 🍎)
Getting access token (back channel 🍏)
Mobile apps also cannot generate secret so we have to use PKCE secret there, to get more information I will recommend to visit aaronparecki site.
Conclusions:
- Two types of clients confidential and public;
- The confidential client can keep a secret (web server app);
- Public client can’t keep a secret (SPA);
- PKCE instead of client secret in public client.
Types of the access token
Reference token:
- Often storing in database
- Allow to every kind of operation which you can do with any standard database data, for example, show a list of active tokens
- Can be easy revoked (just delete from database)
- Use for smaller the application because of the requirement of storing all tokens.
Self-Encoded Tokens:
- Data live in the token itself (JWT)
- Don’t have to be storage
- Separation of concerns, API doesn’t have to a storage access token
- Valid at the API not with DB/HTTP lookup like in reference token
- Cannot get a list of all active tokens
- Better for bigger application
Access token validation
An access token has to be validated once it has been granted. It can become invalid from two reasons expiration or revocation.
Token expiration is related to expiration time, which is one of the properties returned from the OAuth server along with the rest of the data when the application exchange code received from the user to access token.
Imagine a case where access token expiration is set on 1 hour but our application session is longer than that, for example, 4 hours. To deliver the best user experience we don’t want to ask the user to login 4 times in one session — to solve this issue we receive a refresh token along with access token from OAuth server which allows the application to get a new access token for the user in the background. The key difference between access and refresh token is lifetime cycle, the access token is short life so storing it doesn’t require such security as a reference token which has a long life cycle because if an attacker would steal it the consequences would be much worse.
Revocation is quite simple, it takes place when the user tells OAuth server that this token is no longer valid.
Revoked token issue
Note: Pay attention to the fact that if you only do local validation and your access token has expiration time like 4h and after 1h user revokes application to use data then local validation will still be passed because it doesn’t know anything about revokes operation, but if the application would ask OAuth server, of course, it will return, that token is invalid so in worst case scenario you can have an invalid token for 3h but locally it will be still valid, because of that you should process local validation for every protected HTTP request and then in your application decide which data are so sensitive to should make an additional request to OAuth server to check if a token hasn’t been revoked.
Conclusions:
- Two types of tokens reference and self-encoded
- Token can expired or be revoked
- Always ask OAuth server if an access token is still valid before processing a security-sensitive operation
Closing thoughts
These are the basics which (in my opinion) every software engineer should know about OAuth. I hope that it’s just a little bit more accessible than reading official specifications.
As far as I’m concerned I’m still impressed with how good OAuth 2.0 works, and in terms of security it also looks very solid. It’s easy to understand the basic concept and flow of granting rights an application to the user’s data resources which stands behind it. No wonder than almost all application which uses 3rd-party login using OAuth 2.0.
I hope now you are just a bit more familiar with OAuth, thanks for your time!
Stay in touch with me on Twitter or Github.
Resources
[1] https://aaronparecki.com/oauth-2-simplified/#client-credentials
[2] https://oauth.net/2
[3] https://www.oauth.com
